Spark Up Your Electric Fence: Tips and Tricks on Connecting Car Battery to Power it Up!
If you’re looking to keep livestock contained in a specific area, an electric fence can be an effective and affordable option. However, to power the fence, you will need to connect it to a battery. This may sound complicated, but it’s actually a relatively straightforward process that can be done in just a few simple steps.
In this blog post, we’ll go over everything you need to know about how to connect car battery to electric fence. From the tools you’ll need to the step-by-step instructions, we’ll cover it all. So, if you’re ready to get started, let’s dive in!
Step 1: Gather Materials
Before you start connecting your car battery to an electric fence, you need to ensure that you have all the necessary materials at hand. This will help you to complete the process quickly and safely without any hassle. Some of the essential materials that you need include an electric fence charger, electric fence wire, electric fence insulators, a fence tester, an electric fence gate handle, a car battery, and jumper cables.
Make sure to buy these materials from a reputable supplier to ensure that you get high-quality products. Once you have gathered all the necessary materials, you can move to the second step of the process. Remember that safety should be your top priority.
Therefore, you should wear protective gear like gloves to avoid electrocution or accidental shock.
List of items needed to connect car battery to electric fence
To connect a car battery to an electric fence, you’ll need a few key items. First up, you’ll need a car battery, which will serve as your power supply. A 12-volt battery should work just fine.
You’ll also need an electric fence charger, which will provide the necessary voltage to electrify the fence. Make sure to get a charger that’s compatible with your battery and fence setup. And of course, you’ll need an electric fence itself, which typically consists of wire and posts.
Other items you’ll need include grounding rods to safely ground the electrical current, insulated wire to connect the charger to the fence, and insulators to attach the wire to the fence. With these materials in hand, you’ll be well on your way to setting up an effective electric fence using your car battery as the power source. Just be sure to take appropriate safety precautions and follow manufacturer instructions carefully, as working with electricity can be dangerous.
Step 2: Locate the Car Battery
After gathering the necessary materials, the next step to connect your car battery to an electric fence is to locate the car battery. Car batteries are typically located under the hood of the car, often on either the left or right side of the engine bay. In some cases, the battery may be located in the trunk or under the back seat of the vehicle.
If you are unsure of the location of your car battery, consult your owner’s manual or seek assistance from a mechanic. Once you have found the car battery, visually inspect it for any signs of damage or corrosion on the battery terminals. If you notice any signs of wear or damage, it is important to address these issues before proceeding with connecting the battery to the electric fence to ensure the safe and effective operation of the fence.
Where to find car battery in a vehicle
The car battery is an essential component of your vehicle, responsible for powering the engine and providing electricity to other electrical accessories. To locate the car battery, you should start by ensuring the vehicle is turned off and disconnecting any power source. The battery is typically located under the hood of the car, near the front of the engine compartment.
You can look for a rectangular box with two cables attached to it. In some vehicles, the battery may be located under the rear seat, trunk, or in a specially designed compartment. Once you locate the battery, make sure to check the condition of the battery terminals, cables, and the battery itself.
If you notice any signs of wear and tear, such as corrosion or cracks, it’s best to replace the battery to avoid any potential issues while on the road. With the battery located, you can now proceed to remove it or jumpstart it as necessary to ensure your vehicle is up and running again.
Step 3: Connect Wires to Battery
When connecting your car battery to an electric fence, it’s important to make sure everything is properly wired for maximum effectiveness and safety. Begin by identifying the positive and negative terminals on your battery and then attach the wires from the fence controller to the appropriate terminals. The positive wire should connect to the positive battery terminal and the negative wire to the negative terminal.
Make sure the connections are tight and secure before moving on. You may also want to consider using a fuse to protect the fence controller from any electrical surges that could occur. Once everything is connected, you’re ready to turn on the fence and ensure it’s working properly.
With the correct wiring and setup, your electric fence will act as a reliable barrier to keep your animals safe and contained.
Instructions for connecting wires to battery terminals
Connecting wires to battery terminals can seem daunting but it is a simple process. Once you have identified the positive and negative terminals on your battery, you are ready to connect the wires. Start by loosening the nuts or screws on the terminals with a wrench.
Place the exposed end of your wire onto the corresponding terminal, ensuring that the connection is tight. Tighten the nuts or screws to secure the wire in place. It is important to note that the order in which you connect the wires can impact the electrical system.
A good rule of thumb is to connect the positive wire first and then the negative wire. This prevents any accidental grounding of the positive wire and ensures that the electrical system is properly grounded. Once all the wires are connected securely, you can test the system to ensure that everything is working properly.
Follow these simple steps and you will be able to connect your wires to your battery terminals without any problems.
Step 4: Connect Wires to Electric Fence
Connecting a car battery to an electric fence is a crucial step in setting up your fence for maximum protection. To begin, ensure that your battery and fence energizer are both turned off. Then, connect the red positive clip to the energizer’s positive terminal and the black negative clip to the negative terminal.
It’s important to ensure that the clips are securely attached to prevent any accidental shocks. Once connected, turn on the energizer and check that the fence is properly charged. It’s essential to routinely check the battery’s charge and replace it when necessary to maintain optimal performance.
The car battery can provide a reliable and cost-effective power source for electric fences, ensuring that your livestock and property remain protected from unwanted intruders.
Instructions for connecting wires to electric fence components
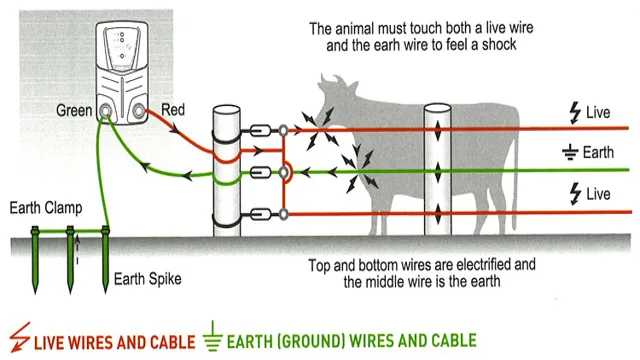
Now that we have securely mounted our electric fence components, it’s time to connect the wires for your fence. First, it’s important to note that there are two types of wires typically used in electric fences: a hot wire and a ground wire. The hot wire is the wire that carries the electric current, while the ground wire is used to complete the circuit and provide a safe path for the electricity to return to the energizer.
To connect the hot wire, start by stripping the insulation off the end of the wire using wire strippers. Next, attach the wire to the appropriate terminal on the electric fence energizer using a wire clamp. Be sure to tighten the clamp securely to avoid any loose connections.
The ground wire should also be securely attached to the ground terminal on the energizer using a wire clamp. This is an essential step in completing the circuit and ensuring that the electric current flows safely through the fence. Once both wires are attached, it’s a good idea to test the fence using a tester to ensure that it’s working properly.
This can be done by touching the tester to the hot wire, and then to the ground wire. The tester should indicate that a current is flowing through the fence. By following these simple steps, you can safely connect the wires to your electric fence and ensure that your animals stay safely contained within your property.
Don’t forget to regularly check your fence for any loose connections or damage to ensure that it continues to function properly. Happy fencing!
Step 5: Test the Connection
Now that you’ve connected your car battery to the electric fence, it’s time to test the connection. Testing the connection is crucial to ensure that the fence is functioning correctly and is safe for your livestock. To do this, take a piece of wire or a tester and touch it to the fence.
If the tester indicates that the fence is energized, you’re all set. If not, you’ll need to go back and check your connections to find where the problem lies. It’s important to always ensure that the connection is secure and the battery is functioning properly.
Remember, the safety of your animals is at stake! By following these steps and testing the connection, you can be confident that your electric fence will keep your livestock safe and secure.
How to test if electric fence is properly connected to car battery
When it comes to testing if your electric fence is properly connected to your car battery, the fifth and final step is to actually test the connection. This can be done by using a voltage meter or a tester tool specifically designed for electric fences. Simply attach the testing tool to the fence wire and ground rod, and then check the readings to ensure that there is an appropriate voltage level.
Ideally, the voltage should be between 4,000 and 6,000 volts. If the voltage is too low, it may indicate a weak or improper connection. On the other hand, if the voltage is too high, it could be dangerous for both the animals and the fence system.
By carefully testing the connection and monitoring the voltage, you can ensure that your electric fence is working properly and providing the necessary protection for your animals or property.
Safety Precautions
Connecting your car battery to an electric fence can be a tricky and potentially dangerous task. It is important to take proper safety precautions to prevent any accidents or damage to your vehicle. First and foremost, always make sure the fence is turned off before making any connections.
You should also wear gloves and protective clothing to prevent any electric shock. When connecting the battery, make sure to connect the positive terminal first and then the negative terminal. This will prevent any sparks from igniting if the negative terminal accidentally makes contact with the metal fence.
Once you have successfully connected the battery, ensure that all connections are secure and that there are no exposed wires. Following these safety precautions can help prevent any incidents when connecting your car battery to an electric fence.
Important safety tips when working with car battery and electric fence
When working with car batteries and electric fences, it is crucial to prioritize safety precautions. First and foremost, always wear gloves and eye protection when handling car batteries as they contain harmful chemicals and can cause serious injury if mishandled. Additionally, it is essential to work in a well-ventilated area to avoid inhaling any fumes.
When dealing with electric fences, make sure the power is turned off before working on any part of the fence. If you are unsure how to properly disable the power source, seek the help of a professional. When working with electric fences, always maintain a safe distance and avoid touching any of the wires or components.
Remember to always be cautious and prioritize safety measures to prevent accidents and injuries. By following these safety tips, you can ensure a safe and successful experience when working with car batteries and electric fences.
Conclusion
Well, if you’re looking for a way to spice up your morning commute, I suppose you could always try connecting your car battery to an electric fence. However, I have a feeling the resulting shock might leave you more awake than you bargained for. In all seriousness though, let’s leave the car batteries for jump-starting engines and the electric fences for keeping livestock in check.
Mixing the two could lead to some pretty shocking consequences. Stay safe out there, folks!”
FAQs
Is it safe to connect a car battery to an electric fence?
Yes, as long as proper precautions are taken. Make sure to wear rubber gloves and disconnect the battery before making any connections.
How do I connect a car battery to an electric fence?
Connect the positive terminal of the battery to the fence energizer and the negative terminal to a ground rod. Use insulated wire to make the connections.
Can I use a deep cycle battery for an electric fence?
Yes, a deep cycle battery is a good option, as it can handle the constant charging and discharging required for energizing an electric fence.
How long will a car battery last when connected to an electric fence?
The battery life will depend on the size of the battery and the power requirements of the energizer. A larger battery will last longer than a smaller one, but it is recommended to have a backup battery on hand in case of depletion.