Boost Your Car’s Power with Parallel Battery Connections: A Comprehensive Electrical Circuit Diagram
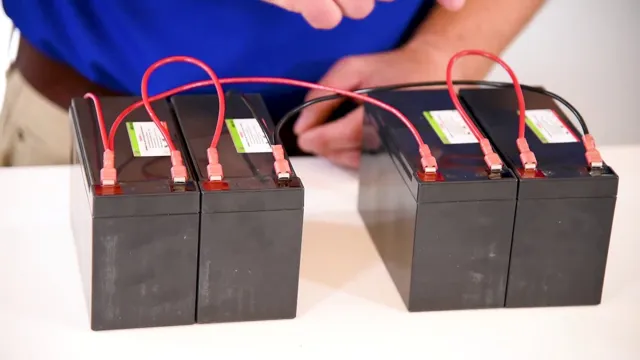
Connecting two car batteries in parallel can be a useful technique if you are looking to boost your vehicle’s electric power supply. Essentially, it involves connecting the positive terminal of one battery to the positive terminal of the other, and the negative terminal of one battery to the negative terminal of the other. But why would you want to do this, and how do you go about it safely? In this article, we will explore the benefits of parallel battery connections, as well as providing some practical tips on how to ensure that the process goes smoothly.
So, buckle up and get ready to learn about this exciting and potentially game-changing aspect of car maintenance!
Basics of Parallel Connection
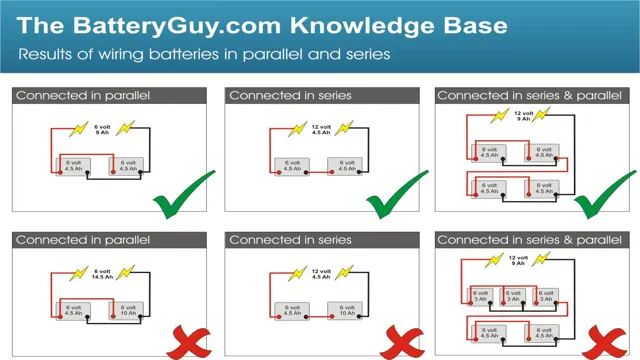
Connecting two car batteries in parallel electrical circuit diagram can be a great solution to keep your car operating efficiently. Essentially, parallel connection is when two or more batteries are connected together to produce more power and increase the overall capacity of the circuit. When connecting two batteries in parallel, it is important to first ensure that the voltage of both batteries matches and that they have the same amp-hour rating.
This is important to ensure that the current is distributed evenly between both batteries. One way to do this is to use a parallel connector, which is a device that helps to connect batteries of similar specifications. Once you have established the connection, you should also consider implementing a battery isolator to prevent battery discharge or damage.
The parallel connection has become a popular technique for not only cars but also in other applications, such as boats and RVs. Overall, connecting two car batteries in a parallel electrical circuit can ensure that your car remains charged and operational, regardless of how many electrical devices you may be using.
What is a Parallel Circuit?
A parallel circuit is a type of electric circuit that has two or more branches for current to flow through. Unlike in a series circuit, where components are connected in a single path, parallel circuits have separate paths for the current to travel through. This means that if one component fails or is removed from the circuit, the others will continue to function.
Additionally, the resistance in a parallel circuit is lower than in a series circuit, which means that more current can flow through it. To understand parallel circuits, one can visualize a highway with multiple lanes. Each lane represents a branch in the circuit, and the cars (current) can choose which lane to take.
The more lanes there are, the less traffic there will be in each lane, allowing cars to travel more quickly and efficiently. Similarly, in a parallel circuit, more branches mean less resistance and more current flow. Understanding how parallel circuits work is important in a variety of fields, including electrical engineering, physics, and even household wiring.
Benefits of Parallel Connection
Parallel connection is a common method of connecting multiple electrical components in a circuit. This involves connecting the positive terminals of the components together and the negative terminals together. By utilizing this circuitry technique, the components are powered equally and can operate independently.
One of the main benefits of parallel connection is that if one component fails, the others will still work since they are not dependent on one another. Additionally, this type of connection increases the current capacity of the circuit, allowing for more power to be delivered to the load. It also allows for easy modification or addition of components without affecting the others.
Overall, parallel connection is a popular and useful method in circuit design, providing flexibility, reliability and safety.
Materials Needed
If you’re looking to connect two car batteries in parallel electrical circuit diagram, there are a few materials you will need. First, you will need two identical car batteries with the same voltage and amperage ratings. You will also need a set of jumper cables or battery cables to connect the batteries.
It’s important to choose cables that are rated for the amperage of your batteries to avoid overheating or damage. Additionally, you may want to consider using a battery isolation switch or a battery combiner to ensure that the batteries can charge and discharge evenly. It’s also important to ensure that the batteries are securely mounted and that they are properly grounded to prevent electrical hazards.
With the right materials and careful setup, you can easily connect two car batteries in parallel to increase the overall power output of your vehicle.
List of Necessary Tools
When it comes to DIY projects, having the necessary tools is essential. Before starting any project, it’s important to have a list of materials needed to ensure you have everything required to complete the job. This includes tools such as a hammer, screwdriver, level, measuring tape, saw, and drill.
Depending on the project, you may also need a sander, paint sprayer, or other specialized tools. It’s important to invest in high-quality tools to ensure they last for multiple projects. By having the right materials on hand, you can save time and frustration during your DIY endeavors.
Remember, always prioritize safety and be sure to wear protective gear such as gloves and goggles when using power tools.
Choosing the Right Cables and Connectors
When it comes to choosing the right cables and connectors for your build, there are a few materials you’ll need to consider. First and foremost, you’ll need to choose the type of cable that’s appropriate for your device or application. This might include Ethernet cables, coaxial cables, or HDMI cables, among others.
You’ll also need to select the appropriate connectors to attach to the ends of your cables. Some connectors are better suited for certain types of cables, so be sure to do your research and choose the best option for your needs. Additionally, you may need crimping tools or soldering equipment to properly attach your connectors to your cables.
It’s important to use high-quality materials throughout your build, as the quality of your cables and connectors can have a big impact on the performance of your devices. By carefully selecting your materials, you can optimize your setup for efficiency, reliability, and overall performance.
Step-by-Step Guide
Connecting two car batteries in a parallel circuit can be a great way to increase your vehicle’s overall power. This process involves wiring the positive terminal of one battery to the positive terminal of the other, and then connecting the negative terminals together. This results in a combined voltage that is equal to the individual batteries’ voltages, but with double the amperage capacity.
This means that you’ll get more power and a longer lifespan from your car batteries. An electrical circuit diagram is useful for understanding how each component of the circuit is connected, and it can be found online or created using online resources. Just be sure to follow all safety precautions when working with electrical components and make sure both batteries have the same voltage rating before you get started.
With a little patience and careful attention to detail, you can easily connect two car batteries in parallel to create a more powerful electrical system.
Step 1: Safety Precautions
When it comes to home improvement, your safety should always be the top priority. Before you even start with any project, make sure to take the necessary safety precautions first. This includes wearing protective gear, such as goggles, gloves, and a mask to avoid inhaling dust or chemicals.
You should also read the instructions carefully and ensure you have the proper tools for the job. Check the area for any potential hazards, such as exposed wires or sharp objects. If you’re working with power tools, make sure to unplug them when not in use and keep them out of reach from children.
Remember, even the smallest mistake can cause serious injuries, so it’s important to be cautious and aware at all times. By taking these safety measures, you can minimize the risk of accidents and injuries and ensure a successful project.
Step 2: Disconnect the Batteries
One of the most critical steps in disconnecting the batteries of your vehicle is to remember to remove the negative cable first. This step prevents any potential accidents as it eliminates the risk of a spark igniting flammable gases produced in the battery when you disconnect the positive cable. Once you have removed the negative cable, the positive cable can be taken out safely.
Some cars may also have additional steps you need to follow to avoid any electrical complications. Be sure to consult your car manual and follow all instructions carefully. Taking these necessary precautions can help keep you and your car safe while you work on it.
Remember, safety should always be a top priority when it comes to vehicle maintenance.
Step 3: Interconnect the Batteries
In this step-by-step guide, we’ll go through the process of interconnecting batteries in a series for greater voltage output. First, it’s important to ensure that all the batteries you plan to use are of the same type and have the same voltage and amp-hour rating. This will ensure that the batteries are charged and discharged evenly.
Next, connect the positive terminal of the first battery to the negative terminal of the second battery using a battery cable. Repeat this process for all the batteries you plan to interconnect. Once you have connected all the batteries, use a battery cable to connect the positive terminal of the first battery to the positive terminal of your device or power inverter.
Then, connect the negative terminal of your device or inverter to the negative terminal of your last battery. This setup will allow you to increase the voltage and amp-hour capacity of the batteries, which can be useful for powering larger devices or running appliances for longer periods of time. Make sure to have a voltmeter to check the voltage levels of your batteries to avoid damage or overcharging.
Step 4: Connect the Cables
Now that you have successfully mounted your new TV on the wall, it’s time to connect the cables so that you can start enjoying your favorite shows. Begin by locating the HDMI ports on your TV, which are usually located on the back or side panel. Ensure that the cables are long enough to reach your TV and other connected devices such as a cable box or gaming console.
Insert one end of the HDMI cable into the HDMI port on your TV and the other end into the corresponding port on your device. If you have an older TV, you may need to use an RCA or component cable to connect your devices. Be sure to match the colors on both ends of the cable to prevent any connectivity issues.
Once you have all your cables connected, turn on your TV, and follow the on-screen prompts to complete the setup process. Congratulations, your TV is now ready to use!
Testing Your Connection
If you’re looking to connect two car batteries in parallel, it’s important to test your connection to ensure everything is working properly. One way to do this is by using a digital multimeter to measure the voltage across both batteries while they are connected in parallel. The voltage should be the same across both batteries, indicating that they are discharging equally.
If the voltage is different, there may be a problem with the connection or one of the batteries. Another thing to check is the overall voltage of the batteries. If the voltage is too high or too low, it can damage your vehicle’s electrical system.
Be sure to consult an expert or do thorough research before attempting to wire two car batteries in parallel. By testing your connection and ensuring everything is in good working order, you’ll be able to avoid any potential damage or complications down the line.
Checking the Voltage
Testing your connection’s voltage is a crucial step in ensuring the efficiency and safety of your electrical devices. By checking the voltage, you can determine whether your equipment is receiving the correct amount of power and whether any issues need to be addressed. To test your connection, you’ll need a voltage tester and a bit of know-how.
Start by turning off the power and removing the outlet cover. Then, hold the voltage tester near the wires to check for voltage. If the tester detects voltage, you’ll need to turn off the power and seek the help of a professional electrician.
Remember, electricity can be dangerous, so it’s always better to be safe than sorry. By regularly testing your connection and seeking professional help when needed, you can ensure that your electrical devices are working efficiently and safely, allowing you to enjoy them for years to come.
Monitoring the Charge Level
When it comes to testing your connection, monitoring the charge level is an essential step to ensure that you have a steady and reliable power supply. Whether you are using a laptop or a mobile device, it is common to experience sudden battery drain or low power indications, which can negatively impact your internet connection. To avoid this, it is important to keep track of the charge level, especially during extended browsing or streaming sessions.
You can easily check your device’s battery level from the system settings or the taskbar if you are on a computer. If you are on a mobile device, you can check the battery percentage from the notification panel or the settings menu. By routinely checking your battery level, you can accurately predict when it is due for a charge and avoid any unexpected disconnections or interruptions while using the internet.
Conclusion and Final Thoughts
In the world of car batteries, two is always better than one. By connecting two car batteries in parallel, you’ll create a circuit that’s as strong and reliable as a superhero’s biceps. Whether you’re pounding the pavement on a cross-country road trip or just looking to boost your battery power during those cold winter months, this simple yet effective setup is the key to keeping your engine running smoothly.
So go ahead and rev up that motor – with a parallel circuit, you’ll be ready to take on whatever challenges the road throws your way!”
FAQs
How do you connect two car batteries in parallel?
To connect two car batteries in parallel, you need to connect the positive terminals of both batteries together and the negative terminals together using a wire or a cable.
What is the purpose of connecting two car batteries in parallel?
Connecting two car batteries in parallel can increase the overall capacity and provide more power to the vehicle’s electrical system.
Can connecting two car batteries in parallel damage the electrical system?
If the two batteries have different capacities or voltages, there is a risk of one battery overcharging or discharging, which can damage the electrical system. It is important to use batteries of the same type, capacity, and voltage.
How do you maintain two car batteries connected in parallel?
Regular maintenance of both batteries is important to ensure they are functioning properly. This includes checking and topping up the water level (for flooded lead-acid batteries), cleaning the terminals, and checking the voltage regularly.