2026 Electric Car Conversion Toyota Corolla Guide and Tips
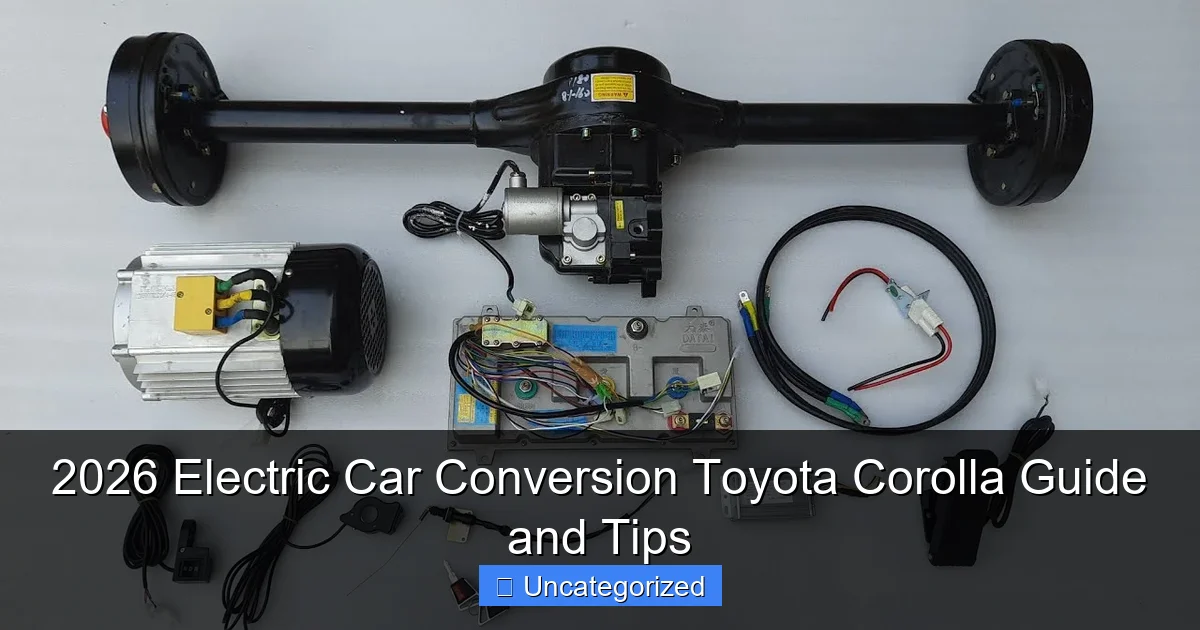
Featured image for how to electric car conversion toyota corolla
Image source: i.ytimg.com
Transform your 2026 Toyota Corolla into a high-efficiency electric vehicle with this essential conversion guide—covering everything from battery selection and motor compatibility to legal compliance and cost-saving tips. Whether you’re a DIY enthusiast or working with a pro, discover how to maximize performance, range, and resale value while embracing sustainable driving without sacrificing the Corolla’s legendary reliability.
How to 2026 Electric Car Conversion Toyota Corolla Guide and Tips
Key Takeaways
- Plan thoroughly: Assess your Corolla’s compatibility and budget before starting the conversion.
- Choose quality components: Invest in reliable batteries, motors, and controllers for optimal performance.
- Prioritize safety: Follow wiring and insulation guidelines to prevent electrical hazards.
- Optimize weight distribution: Position batteries strategically to maintain handling and stability.
- Check local regulations: Ensure your converted EV meets road legality and inspection standards.
- Test incrementally: Validate each system stage before full integration to avoid costly errors.
Why This Matters / Understanding the Problem
Gas prices are rising, emissions regulations are tightening, and electric vehicles (EVs) are becoming more popular than ever. But buying a brand-new EV isn’t always in the budget—or the best option for your lifestyle. That’s where a 2026 Electric Car Conversion Toyota Corolla Guide and Tips comes in handy.
Converting your reliable 2026 Toyota Corolla into an electric car lets you keep a trusted vehicle while slashing fuel costs and reducing your carbon footprint. Whether you’re a DIY enthusiast or a green tech hobbyist, this guide will help you turn your Corolla into a quiet, efficient, zero-emission machine—without breaking the bank.
Many people think EV conversions are only for high-performance sports cars or vintage classics. But the 2026 Corolla? It’s actually an ideal candidate. Lightweight, aerodynamic, and built with modern safety standards, it’s a practical platform for an affordable, eco-friendly upgrade.
With the right 2026 Electric Car Conversion Toyota Corolla Guide and Tips, you can avoid costly mistakes, stay compliant with local laws, and enjoy the satisfaction of driving a custom-built EV.
What You Need
Before you start, gather the right tools, parts, and knowledge. This isn’t a weekend project—it’s a 4–8 week build depending on your experience. But with the right prep, you’ll avoid delays and frustration.
Visual guide about how to electric car conversion toyota corolla
Image source: 136531304.cdn6.editmysite.com
Core Components (Must-Haves)
- Electric Motor: 100–150 kW AC induction or permanent magnet motor (e.g., NetGain, Tesla Model 3 rear motor)
- Battery Pack: 40–60 kWh lithium-ion (NMC or LFP chemistry), preferably from a salvaged EV or new modules
- Motor Controller (Inverter): Matches motor voltage and power output (e.g., Curtis, Zilla, or Orion BMS)
- DC-DC Converter: Powers the 12V system (lights, wipers, ECU)
- Onboard Charger: 6.6 kW or 11 kW (Level 2 compatible)
- Charging Port: CCS or J1772 standard, depending on region
- Cooling System: Radiator, pump, and hoses for battery and motor cooling
- Gearbox Adapter Plate & Coupling: Connects motor to transmission (or direct drive)
- HV Cabling & Fusing: 4/0 AWG cables, 200A+ fuses, and high-voltage disconnect switch
Tools & Equipment
- Welding rig (MIG or TIG) or access to a metal shop
- Angle grinder, drill, torque wrench, hydraulic jack
- HV insulation tools (insulated gloves, voltage tester)
- OBD2 scanner (to disable ICE-related systems)
- CAD software (optional, for custom bracket design)
- Multimeter and oscilloscope for electrical testing
Optional (But Recommended)
- Energy Monitoring System: Real-time kWh, range, and efficiency tracking
- Regenerative Braking Kit: Improves range and braking feel
- Custom Dashboard Display: Shows SOC, motor temp, and charging status
- Fire Extinguisher (Class C): For high-voltage emergencies
Pro Tip: Buy used EV components from salvage yards or online marketplaces (e.g., EV West, EV Source). A used Tesla motor or Nissan Leaf battery pack can save you thousands.
Step-by-Step Guide to 2026 Electric Car Conversion Toyota Corolla Guide and Tips
This 2026 Electric Car Conversion Toyota Corolla Guide and Tips breaks down the process into clear, manageable steps. Whether you’re doing it solo or with a team, follow this roadmap to ensure safety, performance, and compliance.
Step 1: Research, Plan, and Budget
Start with a solid plan. Skipping this step leads to costly rework.
- Set a budget: $8,000–$15,000 depending on new vs. used parts.
- Check local regulations: Some states require inspections, EV-specific VIN tags, or emissions waivers.
- Decide on range: 100 miles? 150? This determines battery size.
- Sketch a layout: Where will the battery go? Motor? Controller? Use the Corolla’s trunk, underbody, and engine bay.
Use free tools like SketchUp or Canva to create a 3D layout. Think about weight distribution—too much battery in the rear can cause oversteer.
Warning: Never exceed 30% of the vehicle’s curb weight with added components. The Corolla’s curb weight is ~2,900 lbs; aim for under 900 lbs of new parts.
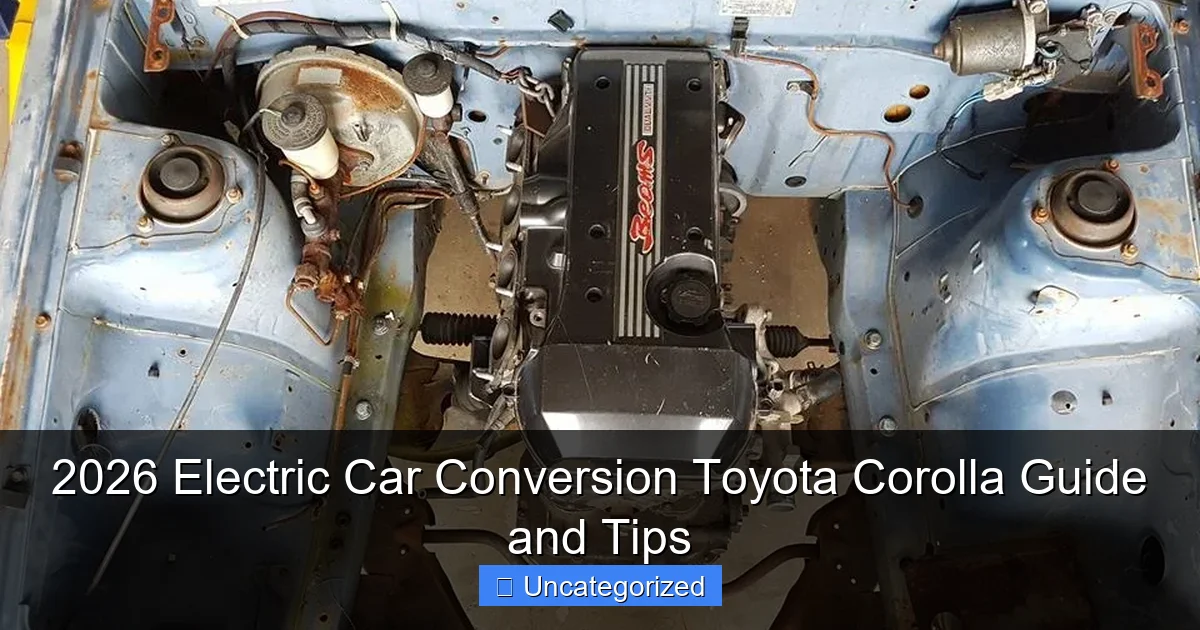
Step 2: Remove the Gas Engine and Components
This is the first major physical step. Safety first.
- Drain all fluids: engine oil, coolant, transmission fluid, brake fluid.
- Disconnect the 12V battery and label all wires (use colored tape).
- Unbolt the engine and transmission as a unit using a cherry picker.
- Remove the fuel tank, exhaust system, radiator, and associated hoses.
- Cap off brake lines and fuel lines to prevent leaks.
Take photos at every stage. You’ll thank yourself later when reassembling or troubleshooting.
Pro Tip: Keep the original ECU disconnected but stored. Some states require proof of original drivetrain for registration.
Step 3: Prepare the Motor and Transmission
The Corolla’s 6-speed manual or CVT can be retained—or you can go direct drive for simplicity.
- Choose a motor that fits the engine bay (measure space: 24″ x 18″ x 16″).
- Fabricate or buy an adapter plate to connect the motor to the transmission input shaft.
- Use a custom coupling (flexible or rigid) to align the motor and transmission precisely.
- Bolt the motor to the transmission using high-strength bolts (Grade 8 or 10.9).
If using a direct drive setup (no transmission), you’ll need a custom mount and a motor with high starting torque. This saves weight and complexity but reduces flexibility in gear ratios.
Test the alignment with a straightedge and feeler gauge. Misalignment causes vibration and premature wear.
Step 4: Install the Battery Pack
This is the heaviest part—plan carefully.
- Choose a location: under the rear seat, in the trunk, or split between both (best for weight balance).
- Fabricate a steel or aluminum battery tray with 1/8″ thick walls.
- Weld or bolt the tray to the Corolla’s frame rails (use factory mounting points).
- Secure each battery module with straps or brackets (no movement allowed).
- Install a high-voltage disconnect switch between the battery and controller.
Use a battery management system (BMS) to monitor cell voltage, temperature, and state of charge. A faulty BMS can lead to thermal runaway.
Warning: Never stack batteries more than 3 modules high without proper ventilation. Overheating is a fire hazard.
For a 50 kWh pack, expect 300–400 lbs. Distribute weight evenly to maintain the Corolla’s handling.
Step 5: Mount the Motor Controller and DC-DC Converter
The controller is the brain. Place it where it’s cool and protected.
- Mount the controller in the engine bay or under the hood (away from water spray).
- Use rubber grommets to reduce vibration.
- Install the DC-DC converter near the 12V battery (under the hood).
- Connect the controller to the motor using high-voltage cables (4/0 AWG, double-insulated).
- Route all HV cables away from sharp edges and moving parts.
Label every wire: “HV Positive,” “Motor Phase A,” etc. Use a wiring diagram from your controller’s manual.
Test the controller with a low-voltage power supply (12V) before connecting to the battery pack.
Step 6: Install the Onboard Charger and Charging Port
Charging should be easy, safe, and fast.
- Mount the onboard charger in the trunk or under the car (protected from rain).
- Run a 10 AWG wire from the charger to the 12V system (for control power).
- Install the charging port in the original gas flap location (clean look) or on the bumper.
- Connect the port to the charger using a J1772 or CCS cable (OEM or aftermarket).
- Add a charge indicator light on the dashboard.
Use a charging interlock—a safety feature that disables the motor when charging.
Pro Tip: Use a Wi-Fi-enabled charger (like ClipperCreek or ChargePoint) to monitor charging remotely via app.
Step 7: Wire the 12V System and Dashboard
Your Corolla still needs lights, wipers, and gauges.
- Connect the DC-DC converter to the 12V battery (AGM or lithium recommended).
- Rewire the ignition switch to activate the EV system (not the starter motor).
- Install a custom dashboard display showing SOC, motor temp, speed, and error codes.
- Use a CAN bus adapter to read data from the motor controller and BMS.
- Retain factory switches (wipers, lights, HVAC) but rewire to the new 12V source.
For HVAC, you’ll need an electric compressor and PTC heater. The stock system won’t work without engine heat.
Test all circuits with a multimeter before powering up the HV system.
Step 8: Cooling System Installation
Overheating kills batteries and motors.
- Install a radiator in the front grille (same location as the old engine radiator).
- Use a 12V pump to circulate coolant through the battery pack and motor.
- Add temperature sensors to both battery and motor (connect to BMS and controller).
- Use non-conductive coolant (e.g., DOW DEX-COOL or EV-specific fluid).
Test the cooling loop with a 12V power supply before connecting to the HV system.
Warning: Never use tap water in the cooling system. Minerals cause corrosion and short circuits.
Step 9: Safety Checks and Grounding
Safety is non-negotiable.
- Ground all HV components to the vehicle chassis (use 4 AWG wire).
- Install a ground fault detector to monitor for HV leaks.
- Check all HV connections with a torque wrench (per manufacturer specs).
- Insulate all exposed metal near HV cables.
- Install a fire extinguisher (Class C) in the cabin.
Perform a “dry run” with the HV system disconnected. Test all 12V systems and controls.
Step 10: First Power-Up and Test Drive
The moment of truth.
- Double-check all connections and grounding.
- Turn on the HV disconnect switch.
- Monitor BMS and controller screens for errors.
- Start in a flat, open area (parking lot).
- Test acceleration, braking, and steering.
- Listen for unusual noises (vibration, whining).
Take it slow. Limit speed to 25 mph on the first drive. Gradually increase as systems stabilize.
After 10 miles, check for overheating, loose bolts, or warning lights.
Pro Tips & Common Mistakes to Avoid
Even with the best 2026 Electric Car Conversion Toyota Corolla Guide and Tips, pitfalls happen. Here’s how to avoid them.
Pro Tips
- Use a conversion kit: Companies like EV West and Electric GT offer Corolla-specific kits. Saves time and ensures compatibility.
- Document everything: Take photos, keep receipts, and log changes. Useful for registration and resale.
- Start with a clean Corolla: A well-maintained 2026 model with low mileage reduces unexpected issues.
- Join an EV conversion forum: Reddit’s r/electricvehicles and DIY-EV.com have active communities.
- Test before you drive: Use a dyno or rolling road to check motor output and efficiency.
Common Mistakes
- Ignoring weight balance: Too much battery in the rear makes the car tail-heavy. Split the pack front and rear.
- Skipping the BMS: Without cell monitoring, one bad cell can destroy the entire pack.
- Poor HV routing
- Using cheap fuses: HV systems need proper fusing. A 200A fuse protects against catastrophic failure.
- Forgetting the 12V system
Warning: Never work on the HV system alone. Always have a spotter nearby in case of emergency.
One builder in Arizona skipped the cooling system. After 15 minutes of driving, the motor overheated and seized. A $1,500 lesson learned.
FAQs About 2026 Electric Car Conversion Toyota Corolla Guide and Tips
Here are the most common questions—answered honestly and clearly.
How much does it cost to convert a 2026 Corolla to electric?
The total cost ranges from $8,000 to $15,000. Used parts (e.g., Tesla motor, Leaf battery) can cut costs by 30–40%. A full new kit from a supplier like EV West runs $12,000–$18,000. Labor adds $3,000+ if you outsource.
Can I keep the Corolla’s transmission?
Yes! The 6-speed manual or CVT works fine with an electric motor. You’ll need an adapter plate and coupling, but it’s doable. Direct drive is simpler but less efficient at low speeds.
How far can a converted Corolla go on a charge?
With a 50 kWh battery, expect 120–160 miles in city driving and 100–120 miles on the highway. Real-world range depends on speed, terrain, and climate. LFP batteries last longer but weigh more.
Do I need to register it as an EV?
Yes. Most states require a conversion inspection and updated VIN tag. You may need to submit wiring diagrams, battery specs, and safety certifications. Check your DMV’s EV conversion page.
Is it legal to drive an EV conversion?
It depends on your state. California, Oregon, and Washington have clear conversion laws. Others may treat it as a “kit car” or “assembled vehicle.” Always check local regulations before starting.
Can I charge it at home?
Absolutely. A Level 2 charger (240V, 40A) takes 4–6 hours for a 50 kWh battery. You’ll need a dedicated circuit installed by an electrician (~$1,000). Level 1 (120V) works but takes 24+ hours.
What’s the biggest challenge in a Corolla EV conversion?
Space and weight management. The Corolla isn’t huge. Fitting a 50 kWh battery, motor, and cooling system without ruining handling is tough. Smart packaging is key—this 2026 Electric Car Conversion Toyota Corolla Guide and Tips helps you plan that.
Final Thoughts
Converting your 2026 Toyota Corolla to electric isn’t just a project—it’s a statement. You’re choosing sustainability, innovation, and independence from gas stations. And with the right 2026 Electric Car Conversion Toyota Corolla Guide and Tips, it’s totally doable.
Start small: plan your budget, research regulations, and source used parts. Take it one step at a time. Don’t rush the safety checks or HV wiring. A single mistake can be dangerous.
Once you’re on the road, you’ll enjoy instant torque, silent acceleration, and a lighter environmental footprint. Plus, you’ll have a one-of-a-kind vehicle that turns heads—and sparks conversations.
So grab your tools, gather your parts, and get started. Your electric Corolla adventure begins today. And remember: every mile you drive is a mile you’re not burning gas. That’s a win for you and the planet.
Ready to go further? Join an EV conversion meetup, share your build online, or help someone else start theirs. The future of transportation isn’t just coming—you’re building it.